
Introduction
Building a gunite pool is an exciting project that can transform your backyard into a stunning oasis. Gunite is a popular choice for pool construction due to its durability and versatility. In this article, we will guide you through the step-by-step process of building a gunite pool, ensuring that you have all the information you need to make informed decisions and create the pool of your dreams.
1. Design and Planning
The first step in building a gunite pool is to carefully plan and design your pool. This involves determining the size, shape, and location of the pool, as well as considering any additional features such as waterfalls or spas. Working with a professional pool designer or architect can help ensure that your vision is accurately translated into a comprehensive pool design.
Once the design is finalized, obtaining the necessary permits and approvals from your local authorities is essential. This may involve submitting detailed plans and specifications, so it’s important to work closely with your designer and follow all local regulations.
2. Excavation
After obtaining the necessary permits, the next step is to excavate the area where the pool will be built. This involves removing soil and creating the hole that will house the pool. The depth and shape of the excavation will depend on the design and specifications of your pool.
During this stage, it’s crucial to ensure that the excavation is done accurately and the dimensions of the pool are maintained. Hiring an experienced excavation contractor can help ensure that the process is carried out smoothly and efficiently.
3. Steel Reinforcement
Once the excavation is complete, the pool’s steel reinforcement is installed. This involves placing a network of steel bars or rods, known as rebar, within the excavated area. The rebar provides structural support and helps prevent cracking or shifting of the pool’s shell.
It’s important to carefully follow the design specifications and spacing requirements when installing the rebar. This step is critical for the overall strength and durability of the pool, so attention to detail is essential.
4. Plumbing and Electrical
After the steel reinforcement is in place, the plumbing and electrical systems are installed. This includes laying the pipes for water circulation, installing the pool’s filtration system, and connecting any lighting or electrical components.
Working with licensed professionals is crucial during this stage to ensure that all plumbing and electrical connections are done correctly and meet safety standards. Proper installation of these systems is essential for the efficient operation of your pool.
5. Gunite Application
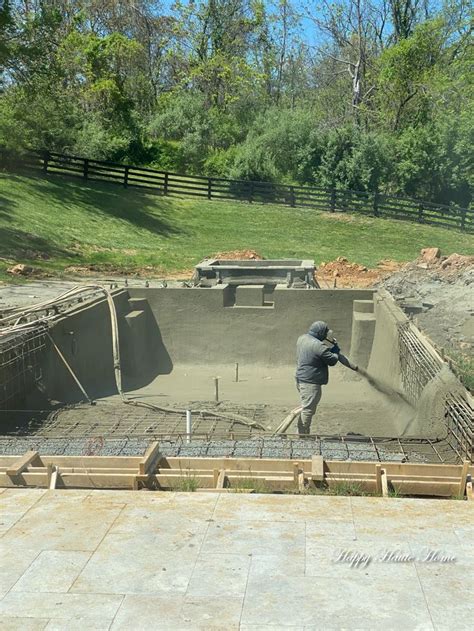
Once the plumbing and electrical work is complete, it’s time for the gunite application. Gunite is a mixture of cement, sand, and water that is sprayed onto the steel reinforcement to create the pool’s shell. It is a versatile material that allows for customized shapes and designs.
During this stage, skilled workers use specialized equipment to apply the gunite evenly and create a smooth, durable surface. The thickness of the gunite shell will depend on the design and structural requirements of your pool.
6. Finishing Touches
After the gunite has cured, the final touches are added to complete your gunite pool. This includes installing the pool’s coping, tiles, and any additional features such as waterfalls or spas. The pool is then filled with water and the necessary chemicals are added to balance the water chemistry.
At this stage, it’s important to carefully inspect the pool for any imperfections or issues. Any necessary adjustments or repairs should be addressed promptly to ensure the pool is in optimal condition.
Building a gunite pool is a complex process that requires careful planning, skilled craftsmanship, and attention to detail. By following these steps, you can create a beautiful and long-lasting pool that will provide years of enjoyment for you and your family.

