Introduction
Building a gunite pool is an exciting project that can transform your backyard into a relaxing oasis. Gunite pools are known for their durability and versatility, making them a popular choice among homeowners. Whether you’re looking to cool off on hot summer days or host poolside gatherings, a gunite pool can provide you with endless enjoyment. In this article, we will outline the essential steps involved in building a gunite pool.
Step 1: Design and Permits
The first step in building a gunite pool is to design your dream pool and obtain the necessary permits. Work closely with a pool designer or architect to create a pool design that suits your preferences and complements your backyard. Once the design is finalized, you’ll need to obtain permits from your local municipality. The permits ensure that your pool construction adheres to safety and building regulations.
Step 2: Excavation
After obtaining the permits, it’s time to start the construction process. The second step involves excavation, where the area for the pool is cleared. The pool dimensions are marked, and heavy equipment is used to dig the hole. The excavation process also includes removing any rocks, debris, or tree roots that may interfere with the pool installation.
Step 3: Steel Reinforcement
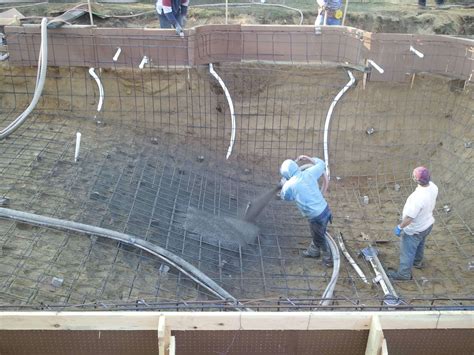
Once the excavation is complete, the next step is to install steel reinforcement. Steel bars or mesh are placed strategically throughout the excavated area to provide structural support to the pool. This reinforcement ensures that the gunite, a mixture of sand, cement, and water, adheres properly and prevents any cracks or shifting in the future.
Step 4: Plumbing and Electrical Work
After the steel reinforcement is in place, the pool plumbing and electrical work can be installed. This step involves laying down the necessary pipes for water circulation, filtration, and heating systems. Additionally, electrical lines are installed for pool lights, pumps, and other electrical components. It is crucial to hire a licensed professional to ensure that all plumbing and electrical work is done safely and according to code.
Step 5: Gunite Application
Once the plumbing and electrical work is completed, the gunite application process begins. Gunite, a mixture of sand, cement, and water, is pneumatically sprayed onto the steel reinforcement. This process allows for flexibility in shaping the pool according to the design. Skilled workers sculpt and shape the gunite to create steps, ledges, and other desired features. The gunite is left to cure and harden, which usually takes a few weeks.
Step 6: Finishing Touches
The final step in building a gunite pool involves adding the finishing touches. This includes installing tiles, decking, coping, and any additional features like waterfalls or fountains. The tiles not only enhance the pool’s aesthetic appeal but also serve as a protective barrier. The decking and coping provide a safe and functional area around the pool. Once the finishing touches are complete, the pool is filled with water, and the necessary chemicals are added to balance the water chemistry.
Conclusion
Building a gunite pool requires careful planning, permits, and skilled professionals to bring your vision to life. By following these essential steps, you can create a stunning and long-lasting pool that will provide years of enjoyment for you and your family.

