Introduction
Are you dreaming of having a swimming pool in your backyard? Building a traditional swimming pool can be expensive and time-consuming. However, there’s a cost-effective and creative solution that you can consider – a DIY container swimming pool. In this article, we will explore the benefits and steps to create your own container swimming pool.
Benefits of Container Swimming Pool
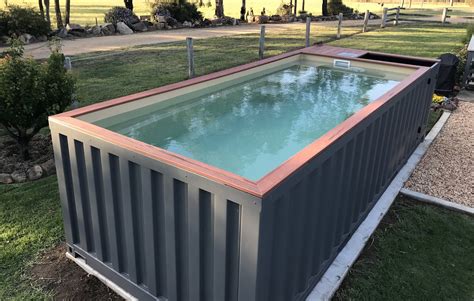
Container swimming pools have gained popularity in recent years due to their numerous benefits. Firstly, they are much more affordable compared to traditional pools. You can easily find used shipping containers at affordable prices and transform them into stylish swimming pools. Secondly, container pools are versatile and can be customized according to your preferences. You can choose the size, shape, and design that suits your backyard. Lastly, container swimming pools are portable. If you move to a new house, you can take your pool with you!
Step-by-Step Guide to Build Your Container Swimming Pool
1. Plan and Design
The first step is to plan and design your container swimming pool. Determine the size and shape of the pool that will fit your backyard. Consider factors such as depth, filtration system, and additional features like a deck or seating area.
2. Obtain a Shipping Container
Next, find a suitable shipping container. Look for containers that are in good condition and free from rust or damage. Measure the container’s dimensions to ensure it fits your design. You can purchase used containers from local suppliers or online marketplaces.
3. Prepare the Site
Clear the area where you plan to install the container pool. Make sure the ground is level and free from any debris or rocks. It’s essential to have a solid foundation to support the weight of the container and water.
4. Install the Container
With the help of professionals or a crane, carefully place the container in its designated spot. Ensure that it is level and stable. You may need to make adjustments by adding supports or leveling the ground beneath the container.
5. Plumbing and Filtration
Hire a professional plumber to install the necessary plumbing and filtration system. This includes connecting the pool to the water supply, installing the pump and filter, as well as drainage systems. It’s crucial to ensure proper circulation and sanitation of the pool water.
6. Customize and Decorate
Once the basic construction is complete, it’s time to add your personal touch. Consider adding a deck, seating area, or landscaping around the pool to create a relaxing oasis. Don’t forget to install safety features such as fences or pool covers to ensure the well-being of your family and pets.
Conclusion
A DIY container swimming pool is a fantastic and affordable option for those who want to enjoy a refreshing swim in their own backyard. With careful planning and execution, you can create a unique and stylish pool that suits your needs. Follow the step-by-step guide in this article, and soon you’ll be enjoying the benefits of your very own container swimming pool.

